
|
CCWorks |
|
Making dreams, reality. One bike at a time |


|
†††††††††††††††† First I have to say that if you are mechanically inclined then carbís and carb tuning is not a hard thing to accomplish with the right tools and done in the right sequence. If you are not, then it can be a daunting task to accomplish with any sense of doing a good job. I am going to try and walk you through a complete carb rebuild and tuning process from start to finish. The carbís I will be using are Hitachi's that came off of my 81-750. This bike has not been run in over 6 years do to a divorce, new wife, two kidís and life in general. They have been under my house for quite a few years so a complete rebuild is in order. |
|
Carb Tuning |


|
This is a document in progress please check back for updates. |
|
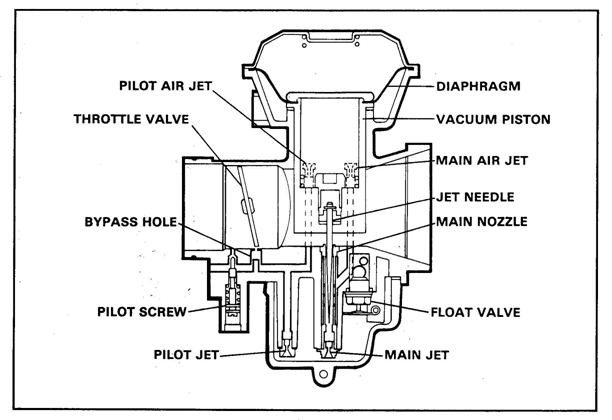
†††††††††††††††† 1. Diaphragm
†††††††††††††††† 3. Vacuum Piston
†††††††††††††††† 4. Jet Needle and Main Nozzle †††††††††††††††† †††††††††††††††† These are a matched set. IF you were to need to replace these, ďby the bookĒ you should replace both at the same time. Donít modify the needle or the seat. You will create more problems than you fix. Insure they are both clean and free of obstruction.
†††††††††††††††† 5. Throttle Valve †††††††††††††††† †††††††††††††††† This should be a no brainer. If you have to ask then have someone else do the rest.
†††††††††††††††† 6. Bypass Hole †††††††††††††††† †††††††††††††††† This is for initial acceleration. Since there is not an accelerator pump, as the throttle valve is opened, it creates sudden rich condition to get the engine to speed up. In short it is the accelerator pump without the mechanical parts.
†††††††††††††††† 7. Pilot Screw †††††††††††††††† †††††††††††††††† This to most would be known as the main idle screw. It is the rough idle adjustment for the carb. It will get you in the ballpark and you use the external idle adjustment on the side of the carb for the fine adjust. As the rest, clean, clear and leave alone. When adjusting always do a soft seat. That means don't torque the screw in tight, turn in till you just feel it seat then back out 1 and 1/2 turn for an initial set. If you over tighten you run the risk of damaging the needle or the seat.
†††††††††††††††† 8. Float Valve †††††††††††††††† †††††††††††††††† This lets fuel in and stops it when the fuel gets to the proper depth. If the needle is solid brass then clean and leave alone. Some have a rubber tip, if you do and it is distorted then you will need to replace it.
†††††††††††††††† 9. Pilot Jet †††††††††††††††† †††††††††††††††† This feeds the idle mix, the pypass hole and a small port after the main needle. Some say you need to open this up to a larger size. I have never needed to and don't recommend you to. If you open it up to much you will greatly richen the affected circuits and may end up having to replace the jet for the stock one.
†††††††††††††††† 10. Main Jet †††††††††††††††† †††††††††††††††† This jet is what makes or breaks your bike. To small and you run lean, to big and you run rich. Unless you are changing your intake or pipes, clean, clear and leave alone.
†††††††††††††††† The easiest way to do these carbís is to remove them, take them apart (donít split them), give them a good cleaning and put them back together.† Turn in the idle jet to soft seat and out 1 and 1/2 turn, put them back on and fire it up. Adjust the rough idle using a mercury stick (it doesnít have mercury in it but they use to) to sink the carbís on idle and unless you have change the air cleaner to other than stock or you have other than stock pipes everything else should be good to go.
†††††††††††††††† There are only three things you should have to change or adjust even if you run no air cleaner and straight pipes. Here is a fairly good guide to go buy.†
†††††††††††††††† This is what I go by as a rough in the ballpark guide. This will get you to the point to where you can adjust to the final settings and sinc. |
|
Stock air cleaner and pipes |
No change to needle or main jet |
|
Modified air cleaner stock pipes |
Open main jet with a 1.2 mm drill bit may need 1 flat washer under needle |
|
Opened exhaust stock air cleaner |
Shim needle 1 to 2 flat washers leave main jet alone |
|
Modified air cleaner and open exhaust |
Open main jet with 1.2 mm bit, add 2 to 3 washers under needle |