
|
CCWorks |
|
Making dreams, reality. One bike at a time |


|
Frame part 2! |
|
First things first, we need to take the old neck and clean it up. Be sure not to damage or deface the VIN, it can cause headaches in the future and is against federal law to tamper with. Hard time in Leavenworth people, think about it.
Once it is clean and prepped for the welding go ahead and put it on the jig. Take the time to double check it is level and true. One thing you need to think about when dealing with necks is this, factory necks are usually made of DOM (Drawn Over Mandrel) .120 wall. This is very easy to weld and needs no pre-heat to get good penetration and weld strength. If you use an aftermarket neck that is machined from a solid piece of cold-rolled then the wall thickness is going to be much greater. There is no way a MIG or TIG will be able to get good penetration without preheating first. If you use one you will need a torch with a rose bud to get a even heat across the surface.
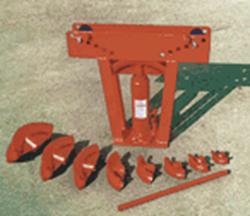
On thing that you have to have is a tube bender. Now I know there is someone out there who is going to say “WOOoooOoooo that’s a pipe bender, that wont bend tube!!!!” and I would say you are correct, however, with a few modifications it can be made to bend tubing very well. Just a little time and patience and you will have a very nice hydraulic tubing bender. Now, the second thing you need is to be able to make consistent bends, with a slight modification to the top of the press you can make an adjustable stop so you can make bend after bend the same with no guess work. |

|
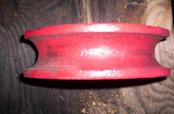
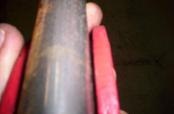
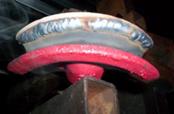
Top Left; Standard “Pipe” die Top Center; You can see the gap between the pipe and the die on the right hand side Top Right; You can see a little better, just this small amount will make it impossible to get a good bend. Bottom Left; Weld a bead to take up the slack Bottom Right; After about 20 minutes on the chop-saw and grinder, pops out 90 % bends all day |